Sunshine Blooms

      No Comments on Sunshine Blooms

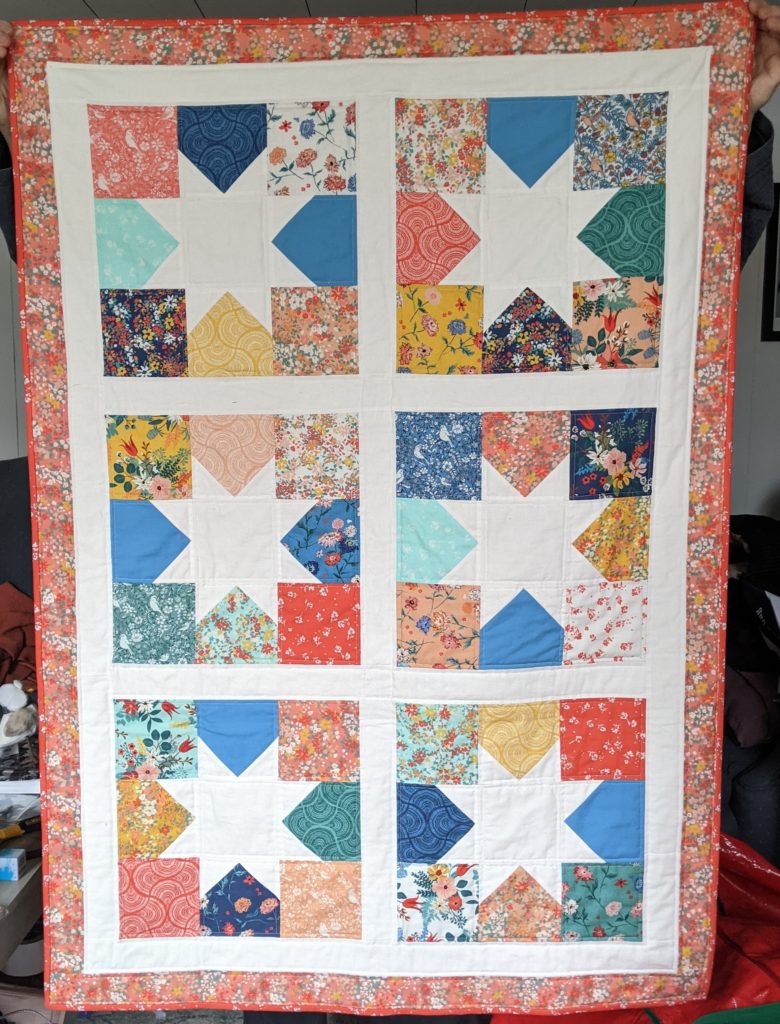
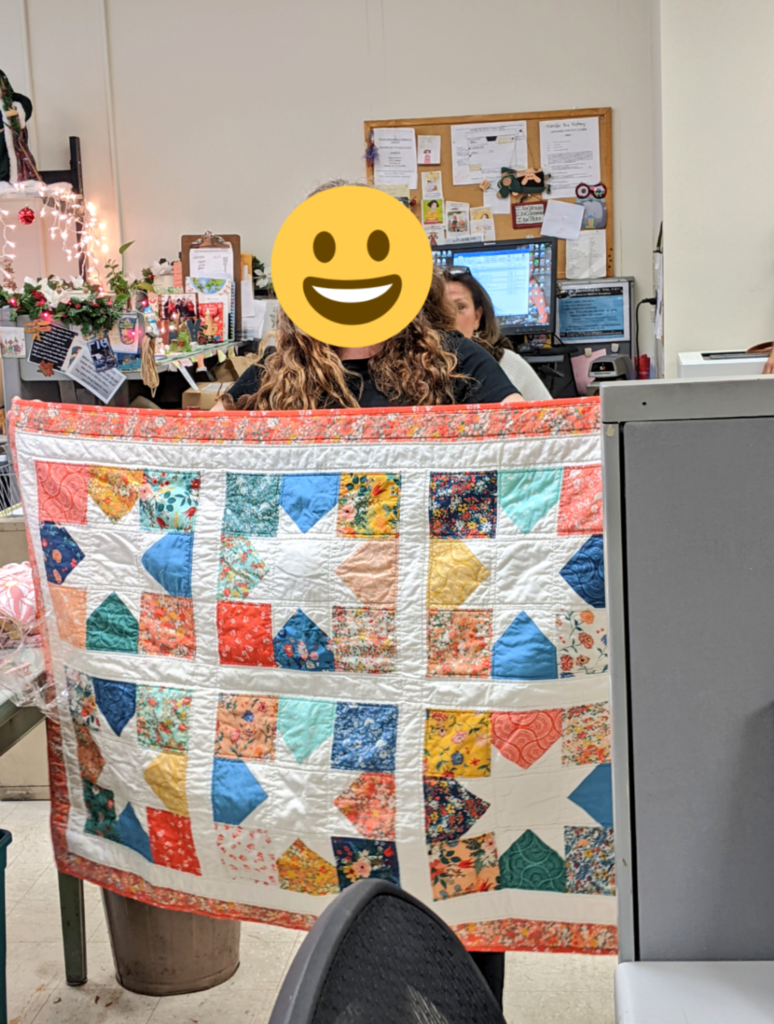
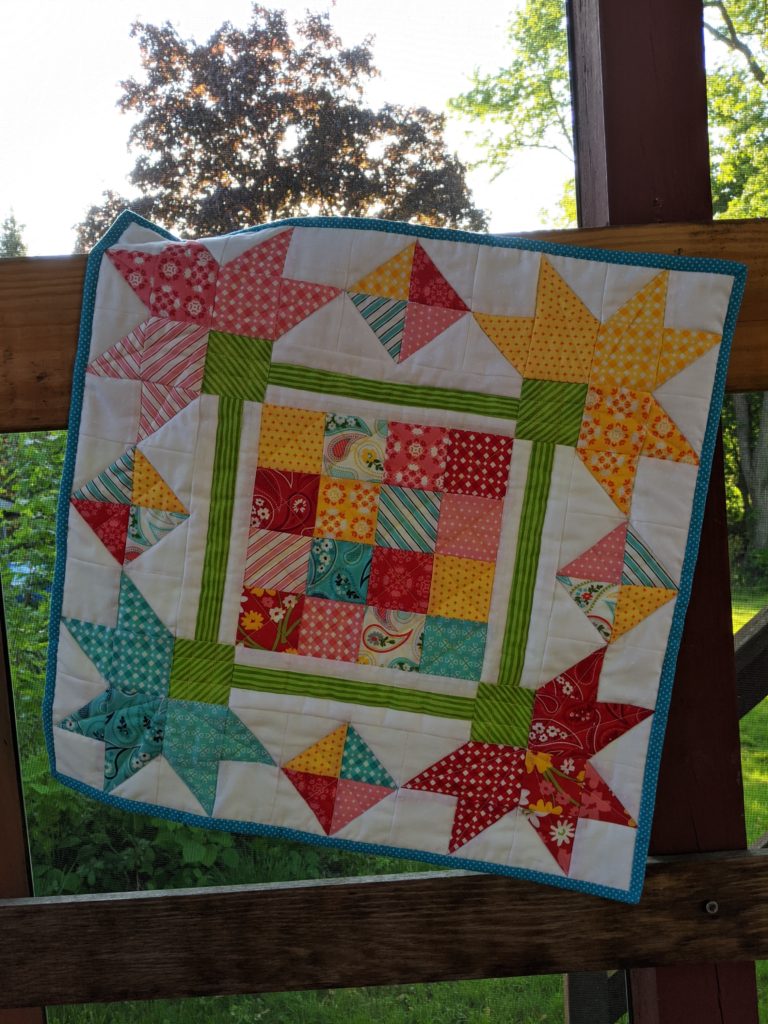
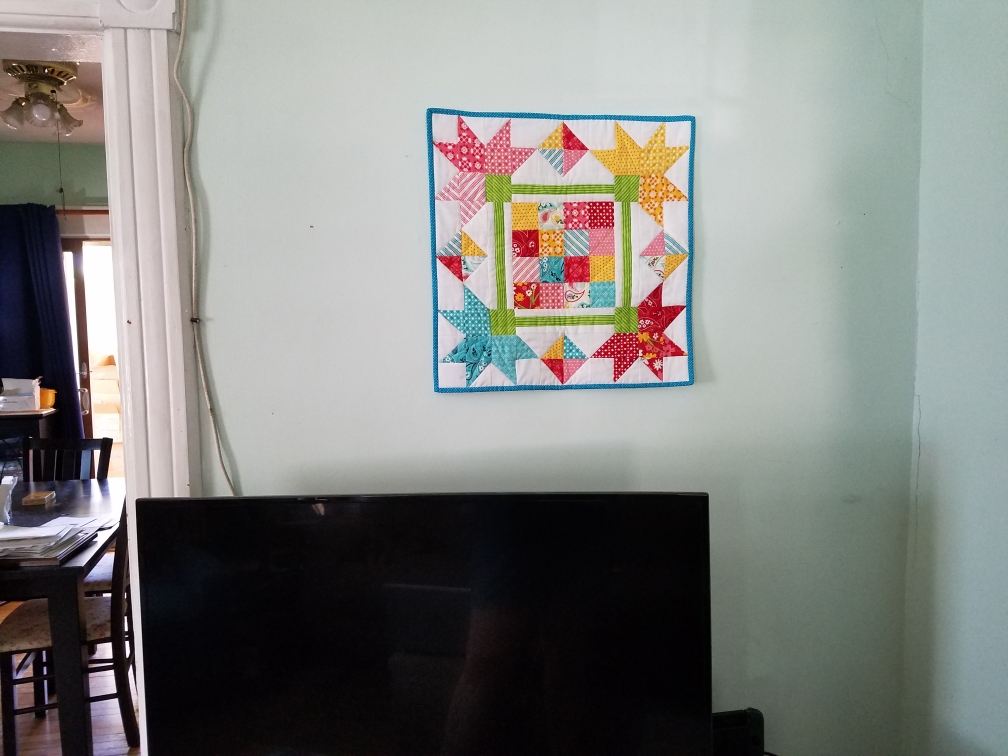
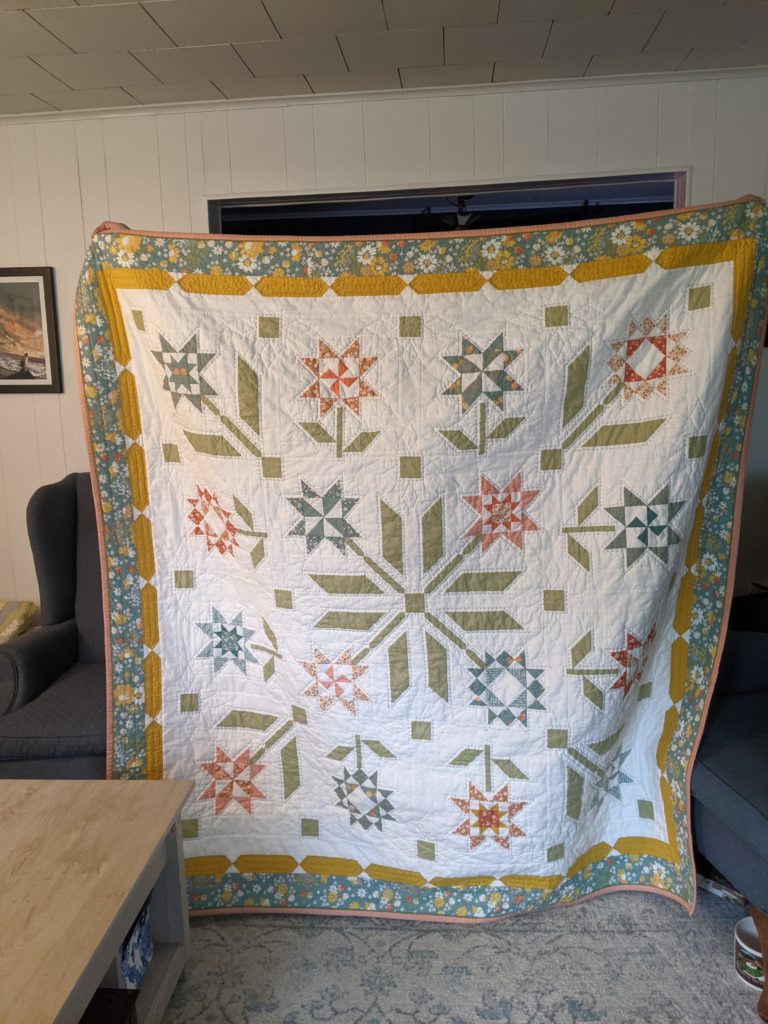
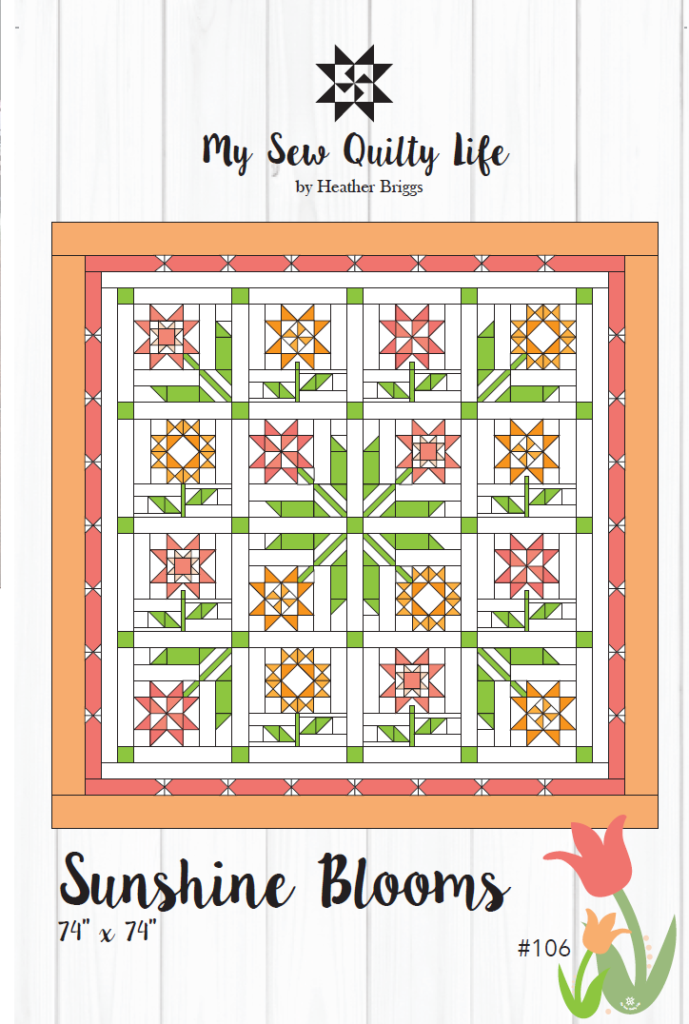
I am the absolute worst at working to a deadline, but it’s not 100% my fault this time! So this is Sunshine Blooms (pattern is by My Sew Quilty Life but I don’t see it in her shop anymore). I altered the pattern a little, in that I rotated all the flowers so they were facing out from the center and I mirrored the leaves on the non-diagonal flowers for more symmetry.

The pattern had all the flowers facing upright, but I wanted more of a symmetrical medallion-y sort of feel. I’m really pleased with it.

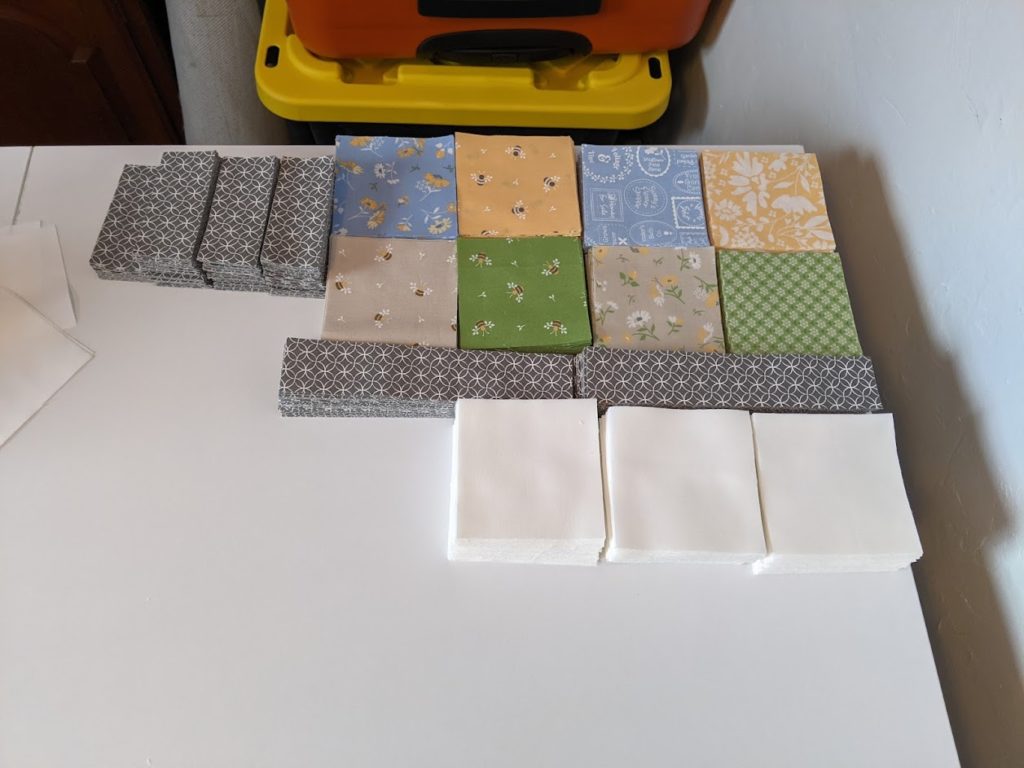
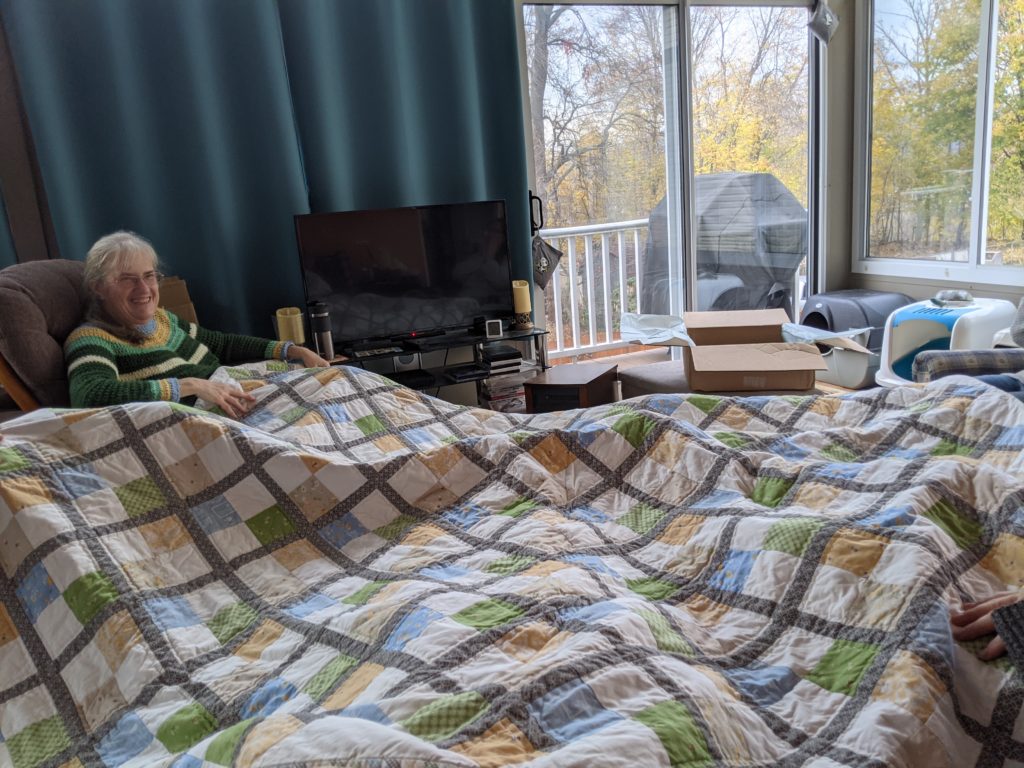
My mom wound up receiving this fully completed quilt around Mother’s Day. It was technically a Christmas present. 😔 While I’m regularly kind of terrible at sewing to a deadline, this time there were some extenuating factors. After browsing a lot of fabric, I decided I wanted to make this pattern in Corey Yoder’s Cozy Up line. It was originally supposed to start shipping in August, which would give me time to get started on the top before I had foot surgery in early October. Covid delays meant the fabric didn’t start shipping until late September/early October. I received my fabric the day before my surgery.

I had to keep my foot elevated for several weeks after my surgery, so I wasn’t able to actually start on the quilt for over a month. I was back at work by that point, so I set my goal at a flower a night. I knew I wasn’t going to be able to fully complete the quilt by Christmas, but I figured I could get the top done and wrap it so my mom had something to open.

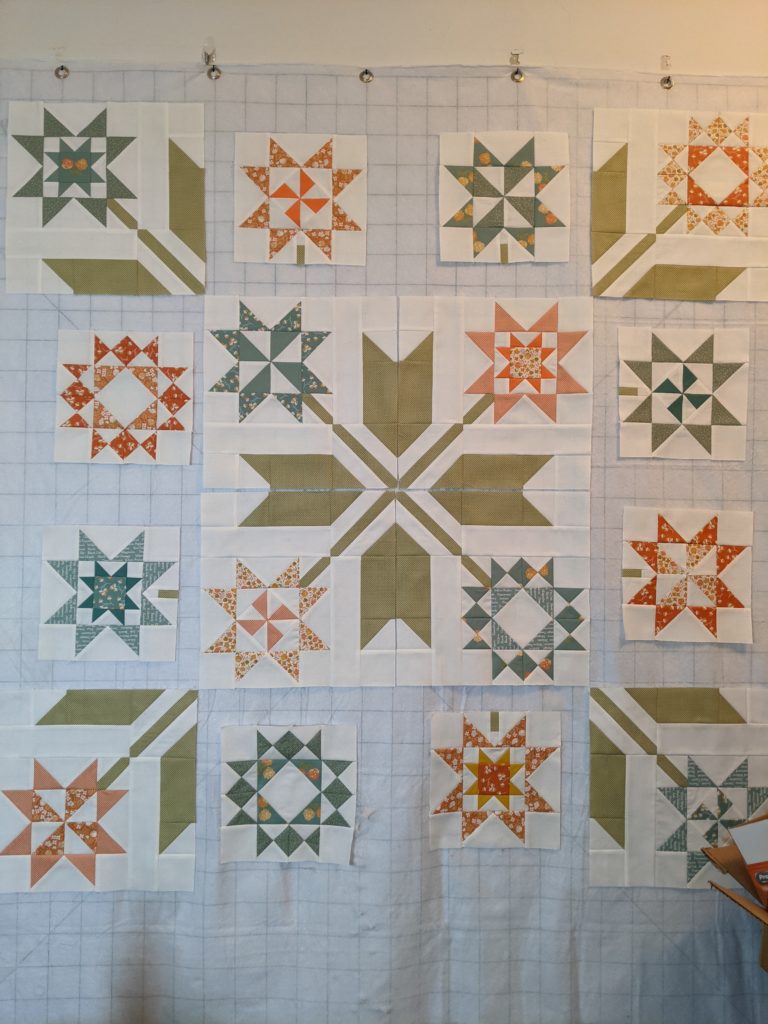
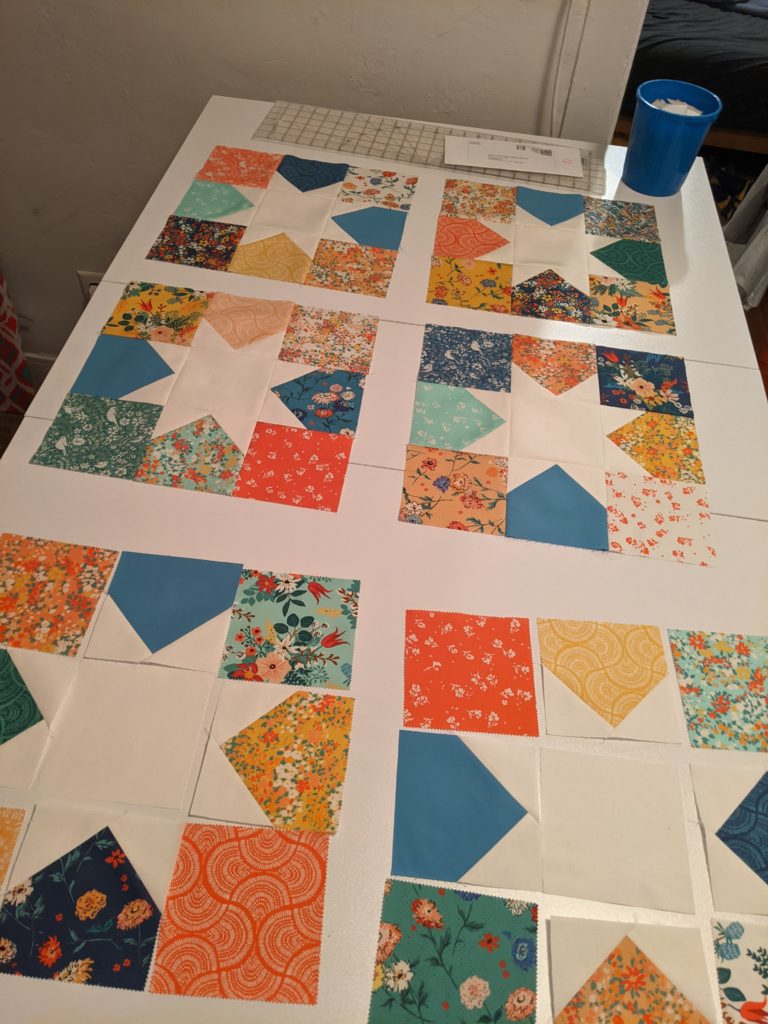
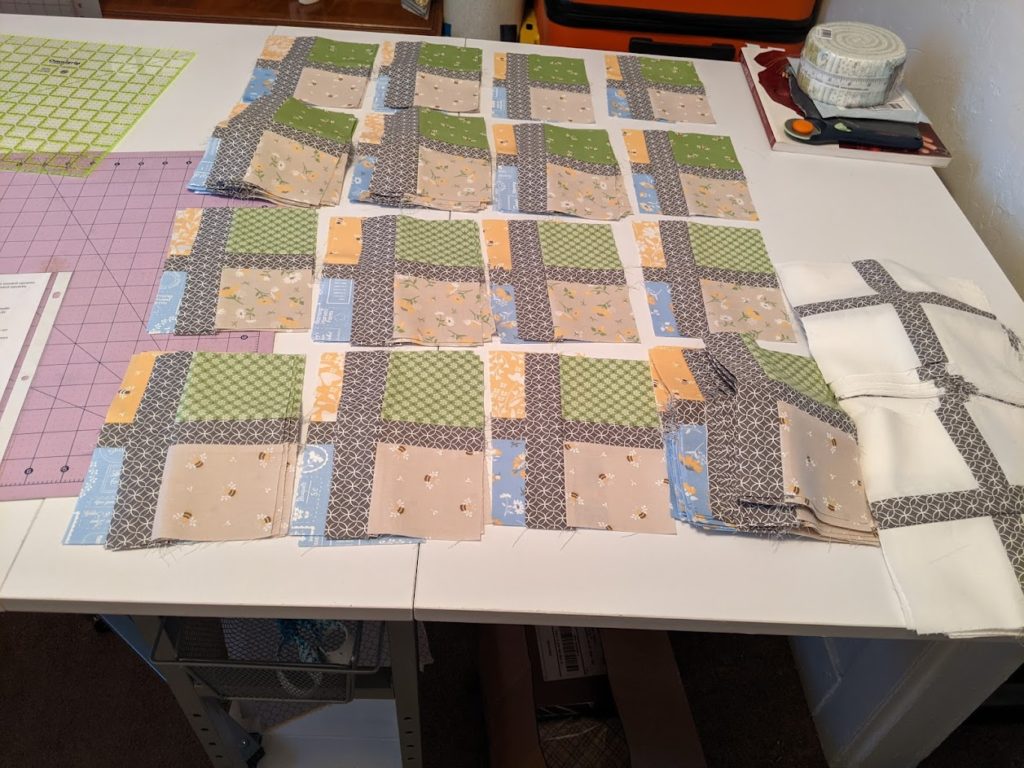
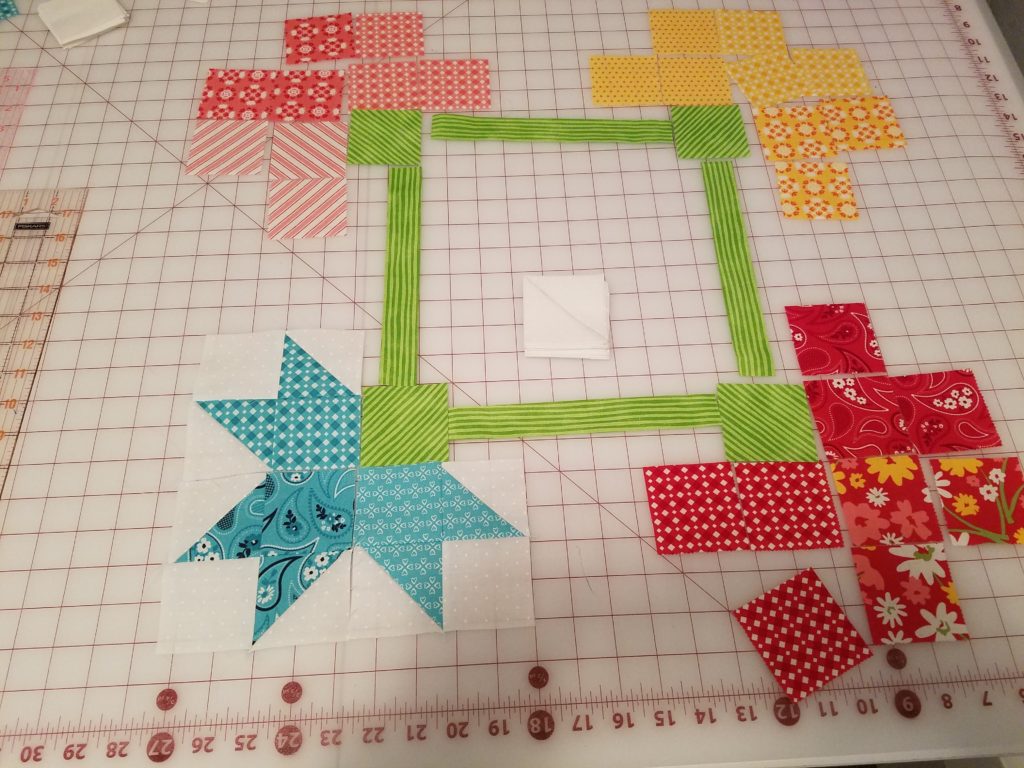
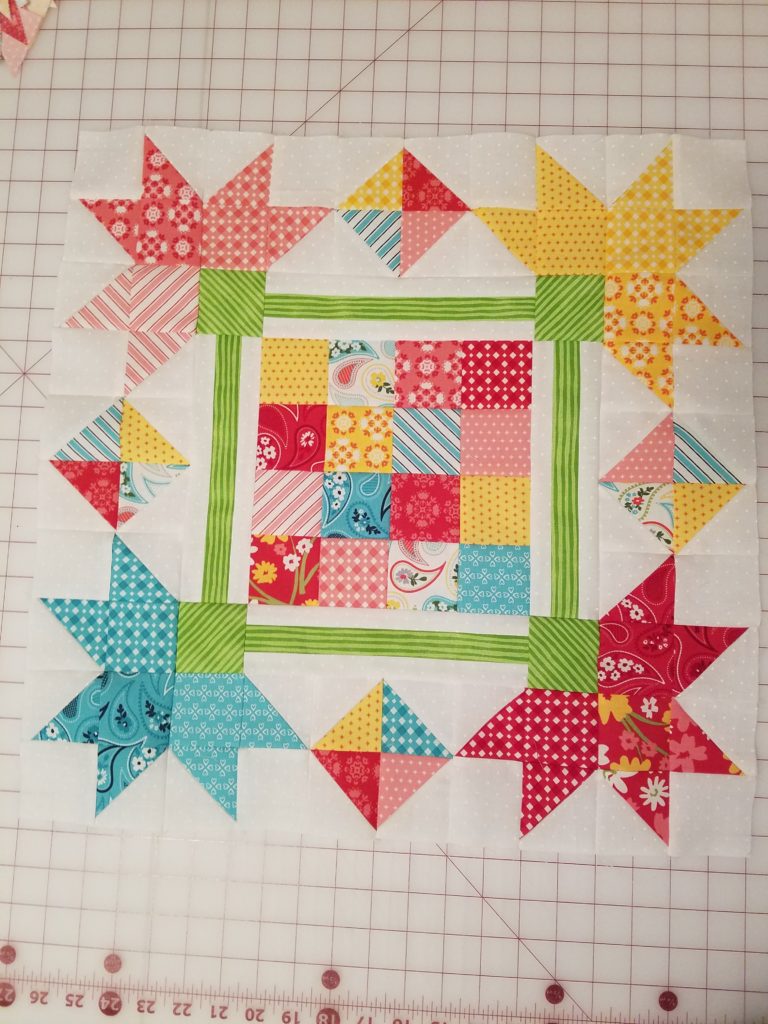
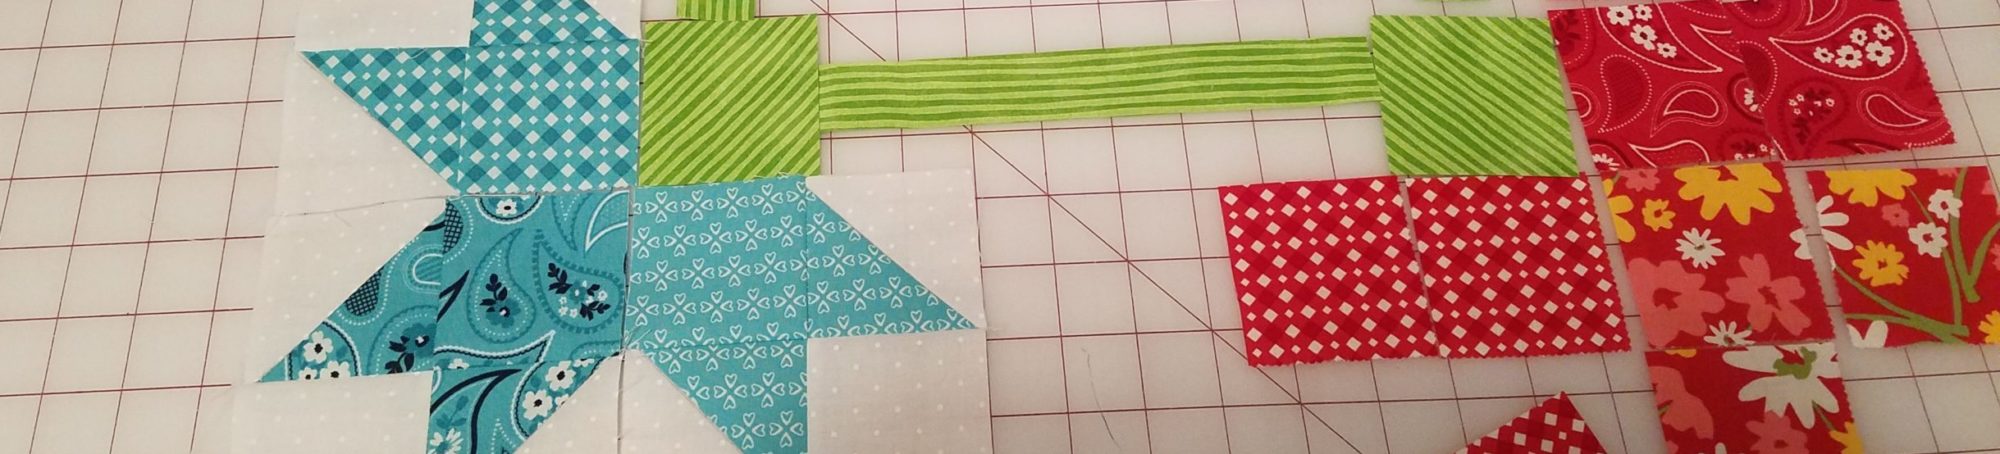
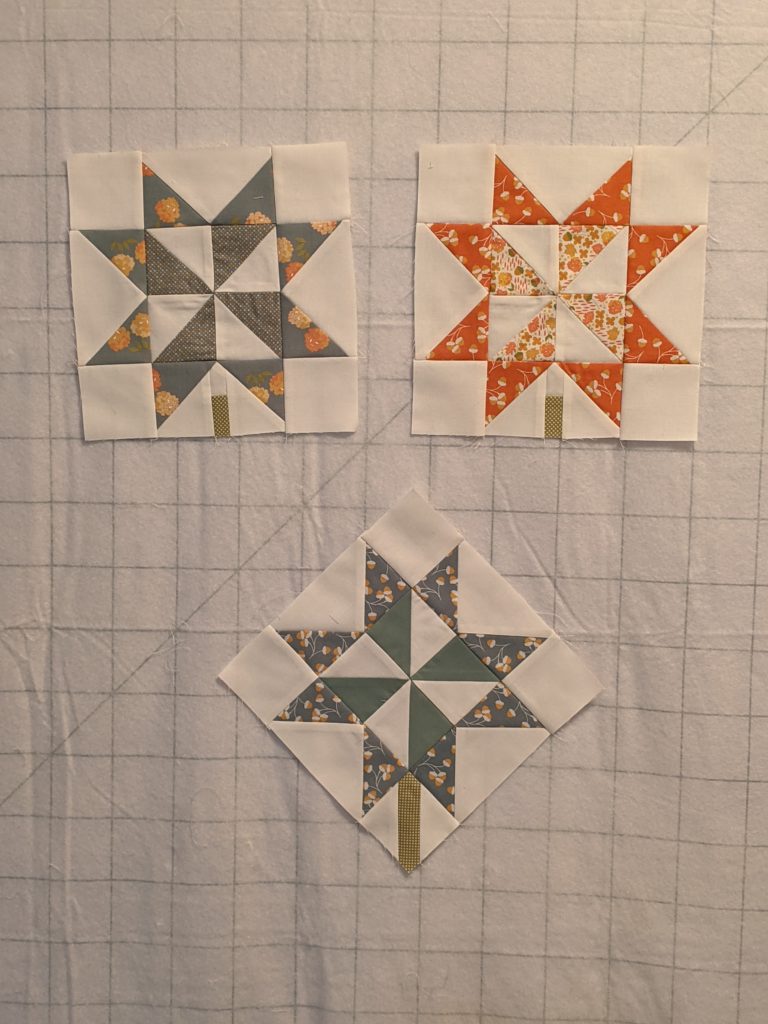
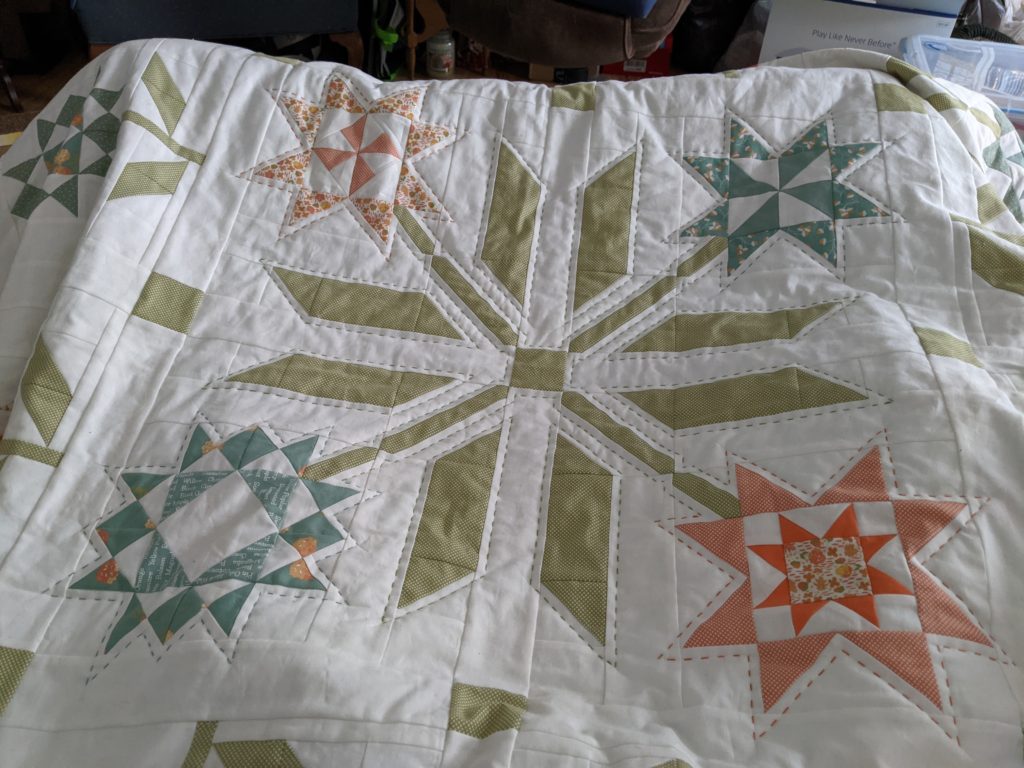
After the flowers themselves came the diagonal leaves…

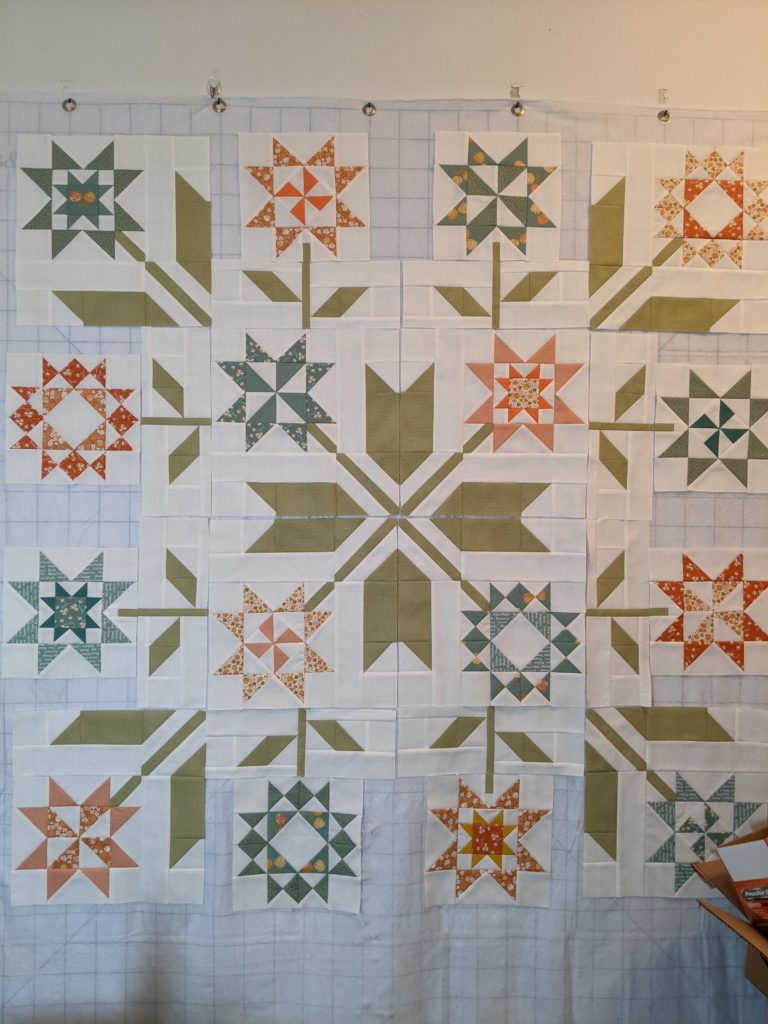
…then the non-diagonal leaves…

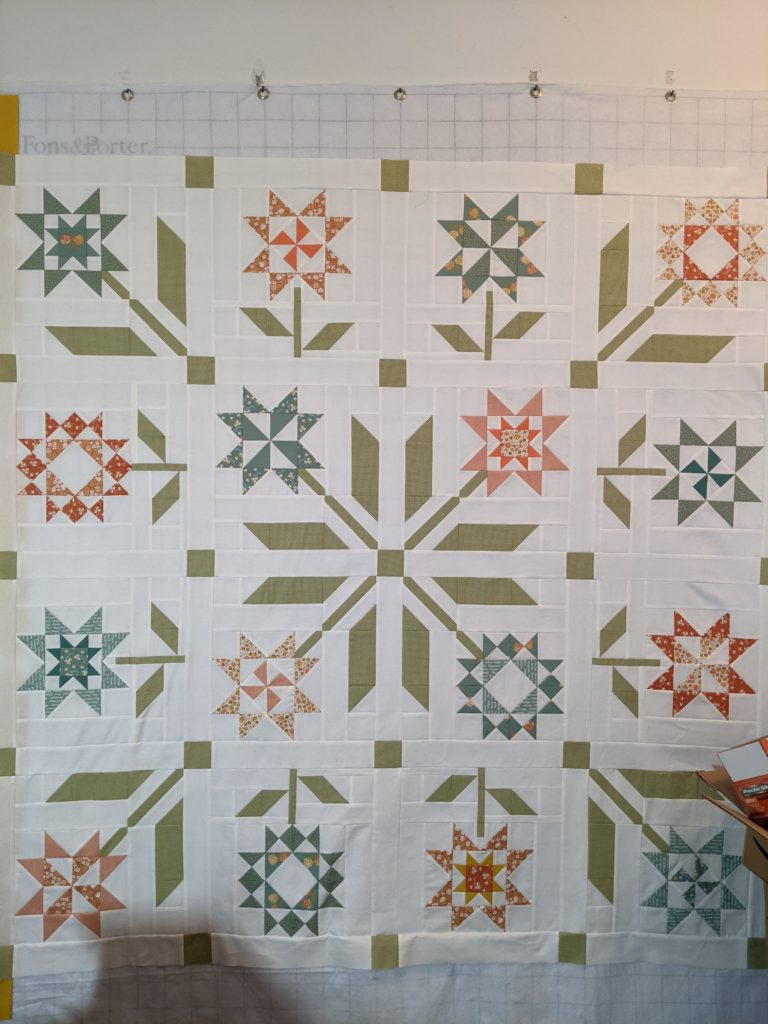
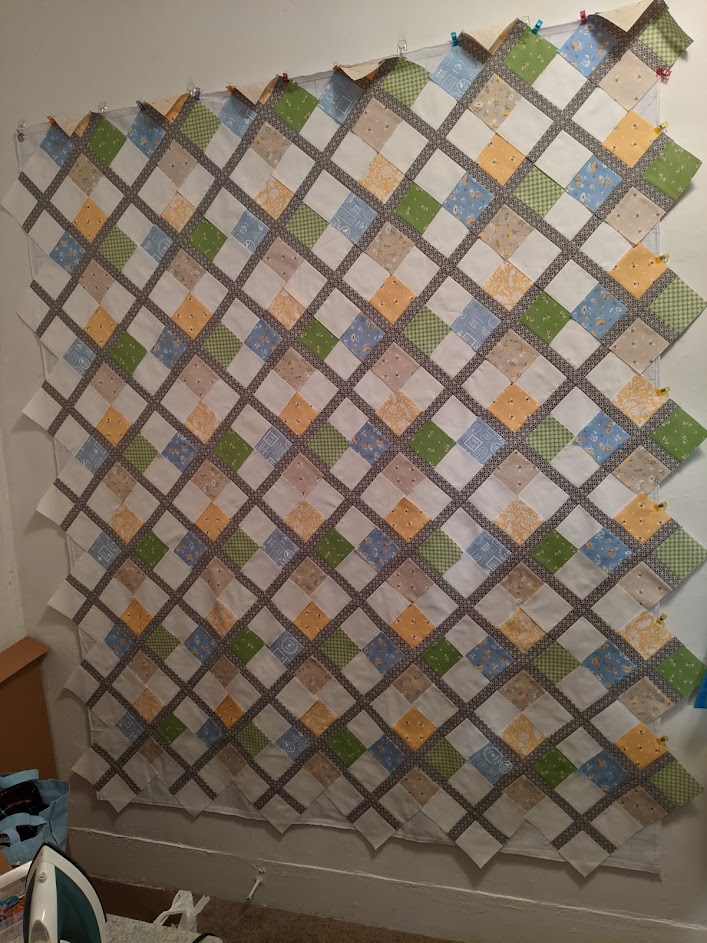
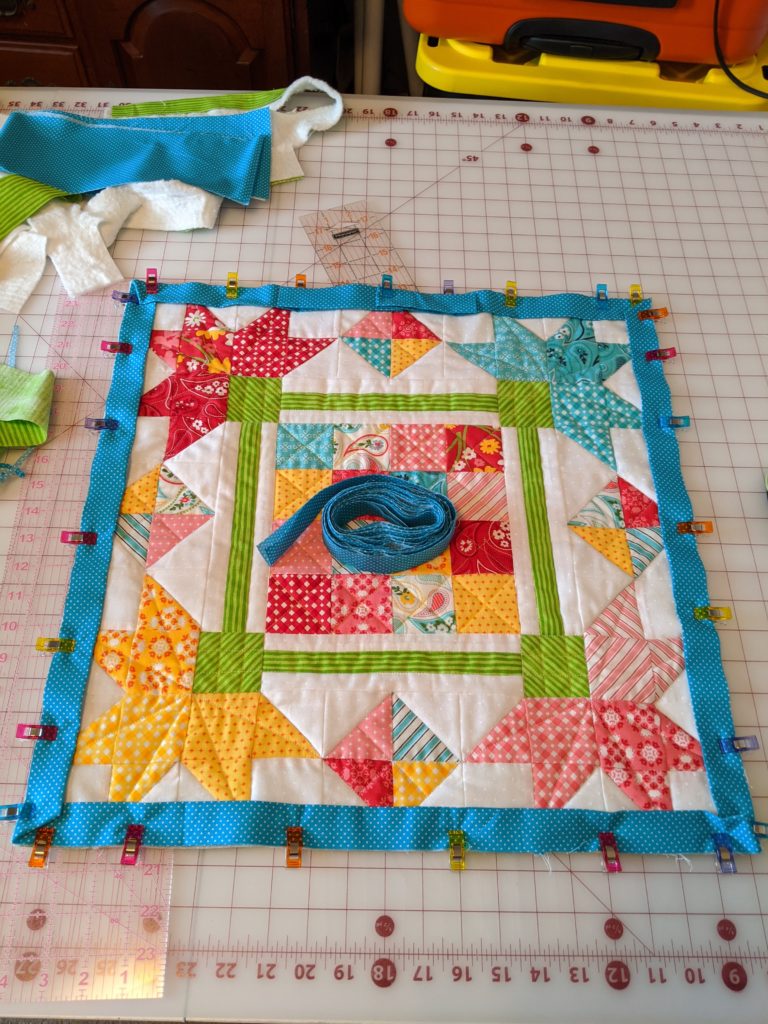
…then the sashing, and (not pictured) the borders.

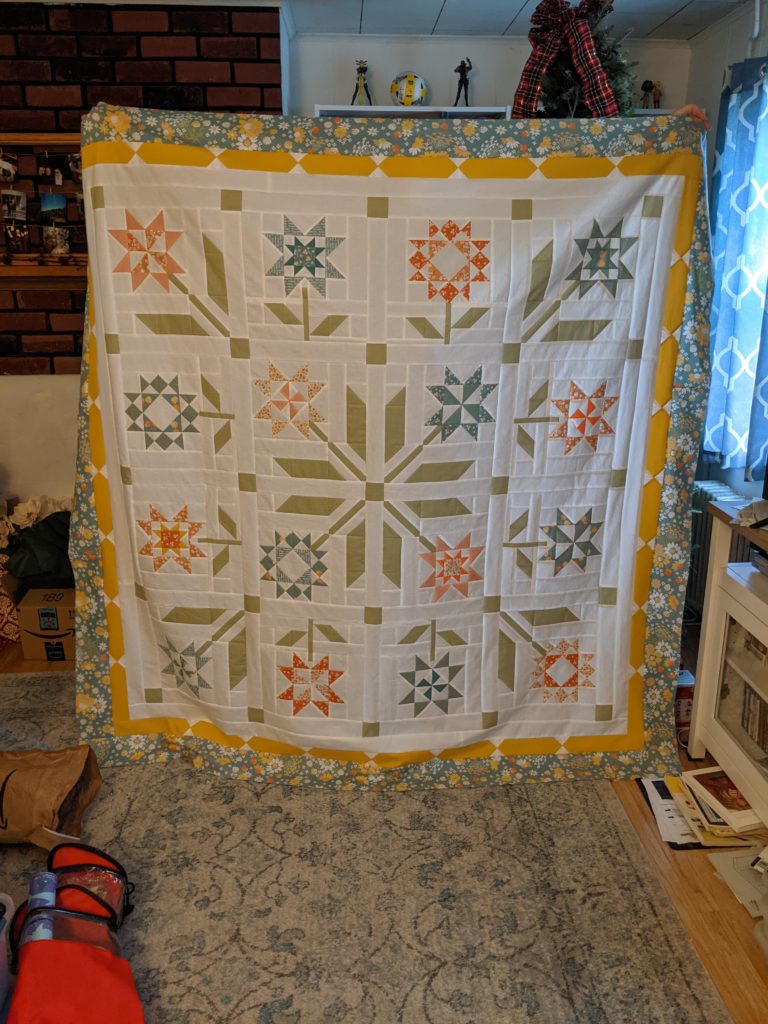
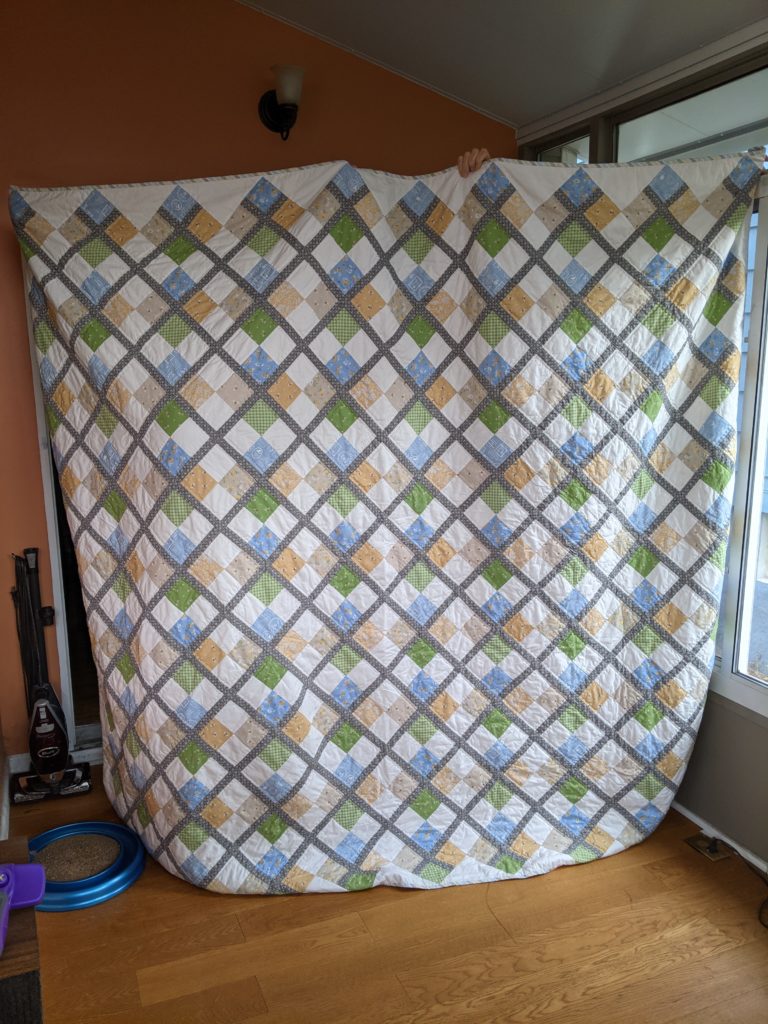
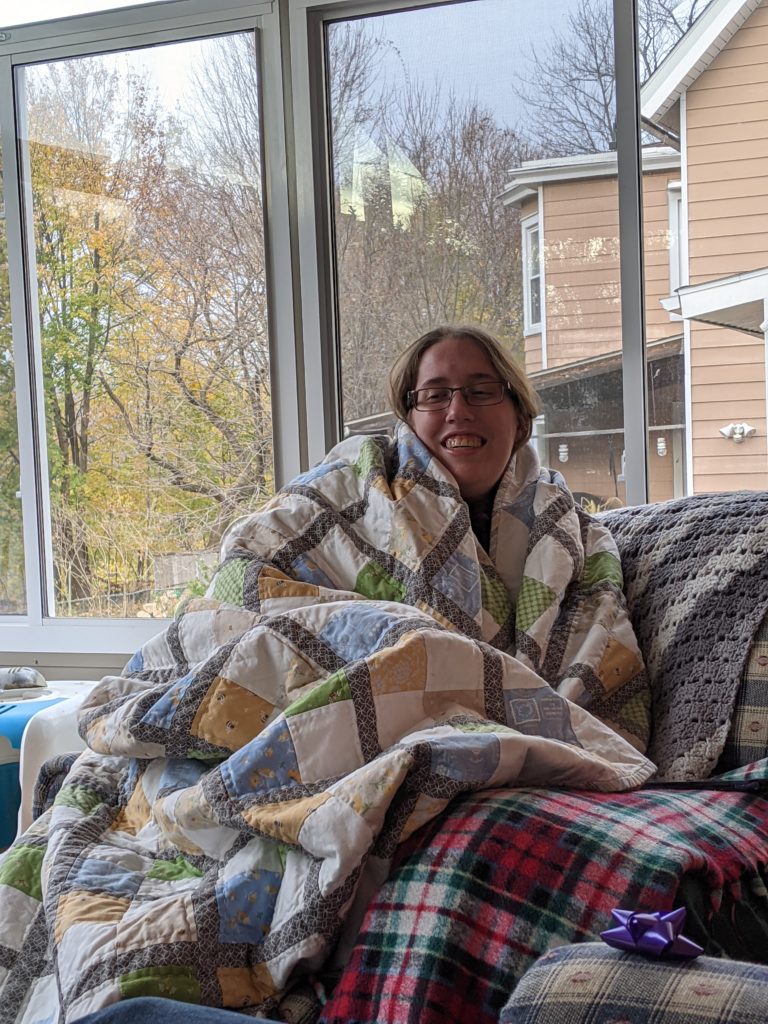
I did get the top done, just in time to wrap it up on Christmas Eve.

Then it all got sandwiched and I started on the quilting. Now that I didn’t have a hard deadline, I’ll admit I kind of…dawdled. I frequently just wasn’t in the mood to quilt, and I didn’t want to make a mess because my heart wasn’t in it.

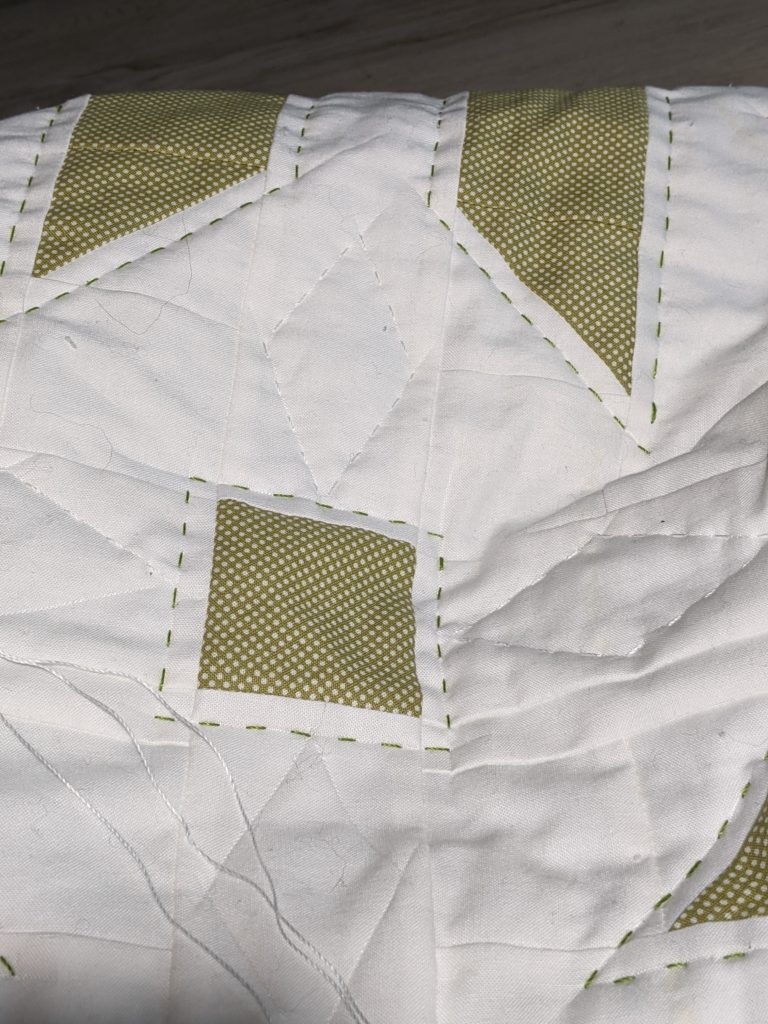
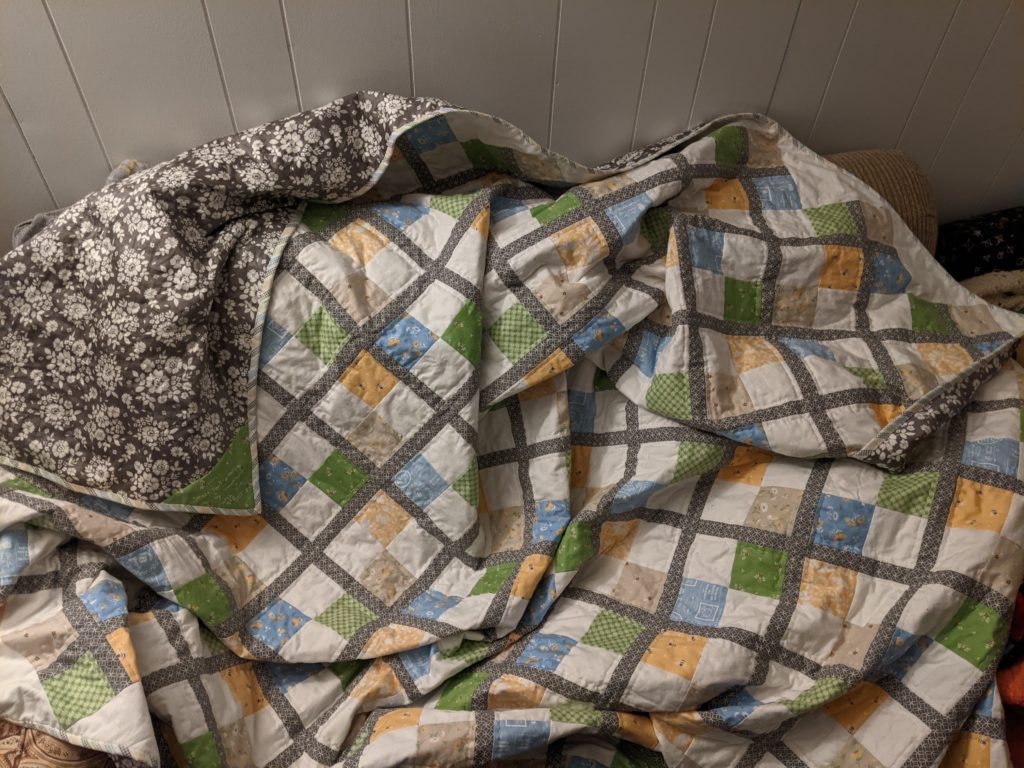
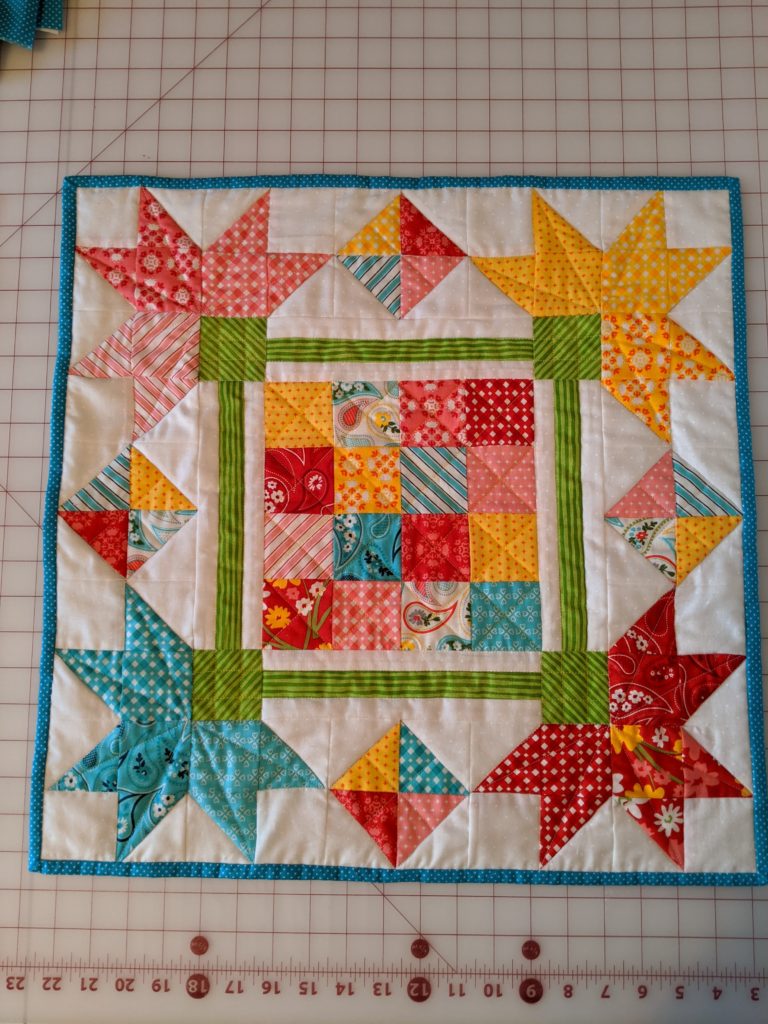
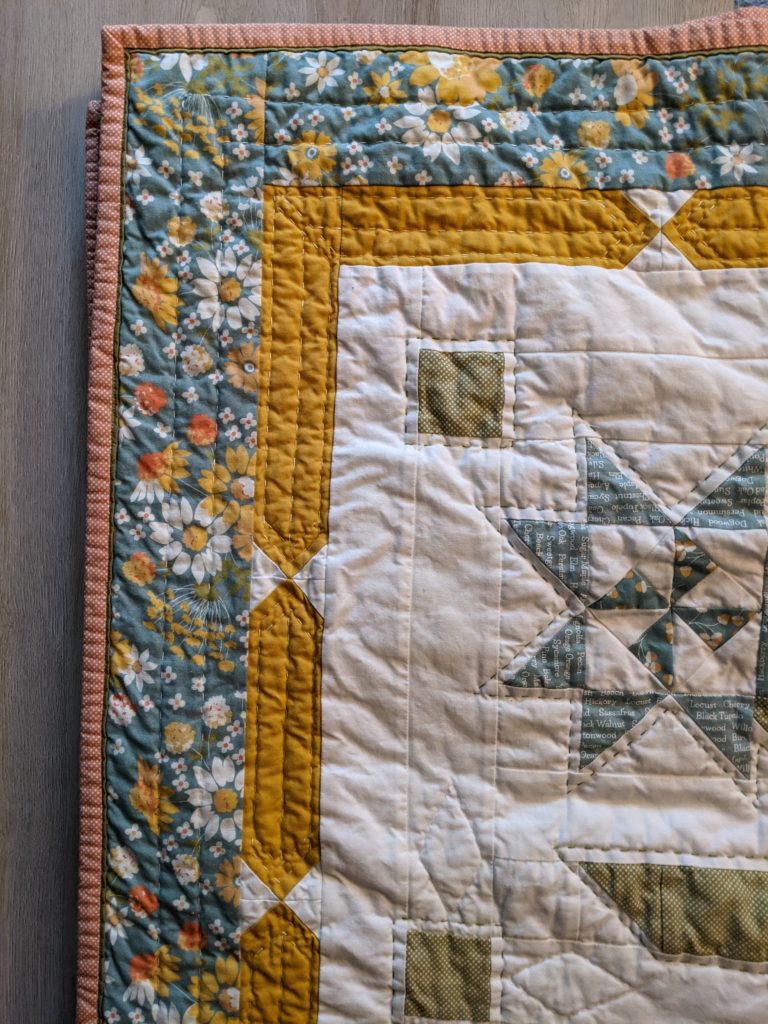
Most of the quilting is echo lines around the leaves and flowers. A few of the squares had a big open space around them, so I put in a few diamonds in subtle white thread.

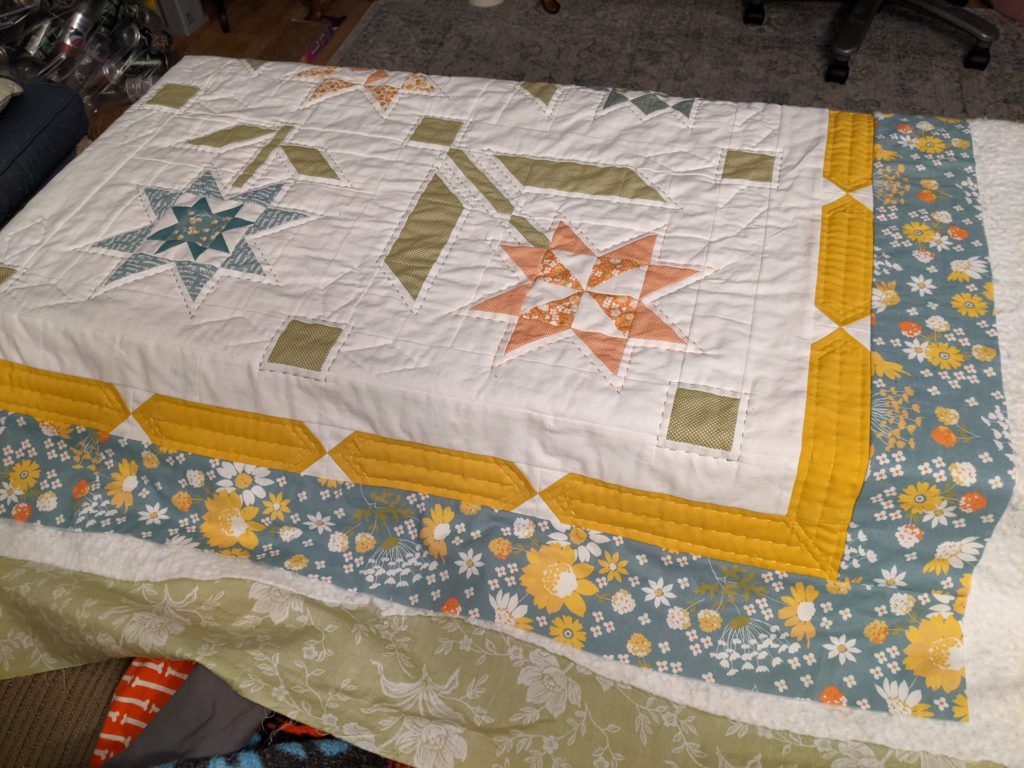
I also used white thread on the borders, and I really love how they turned out.

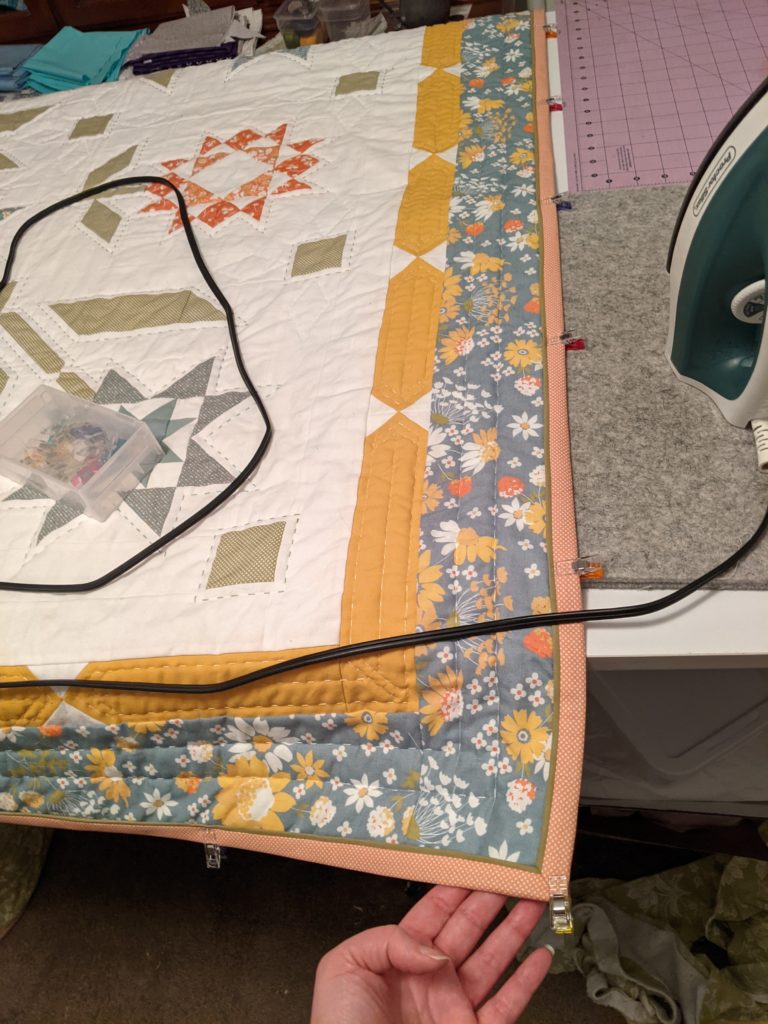
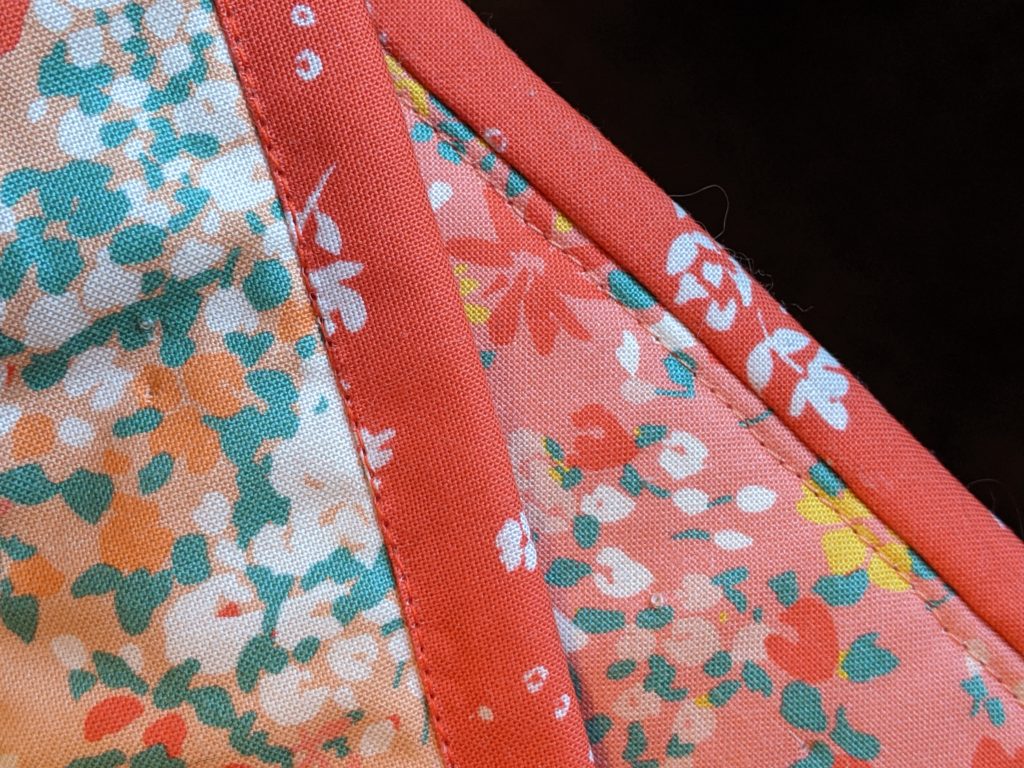
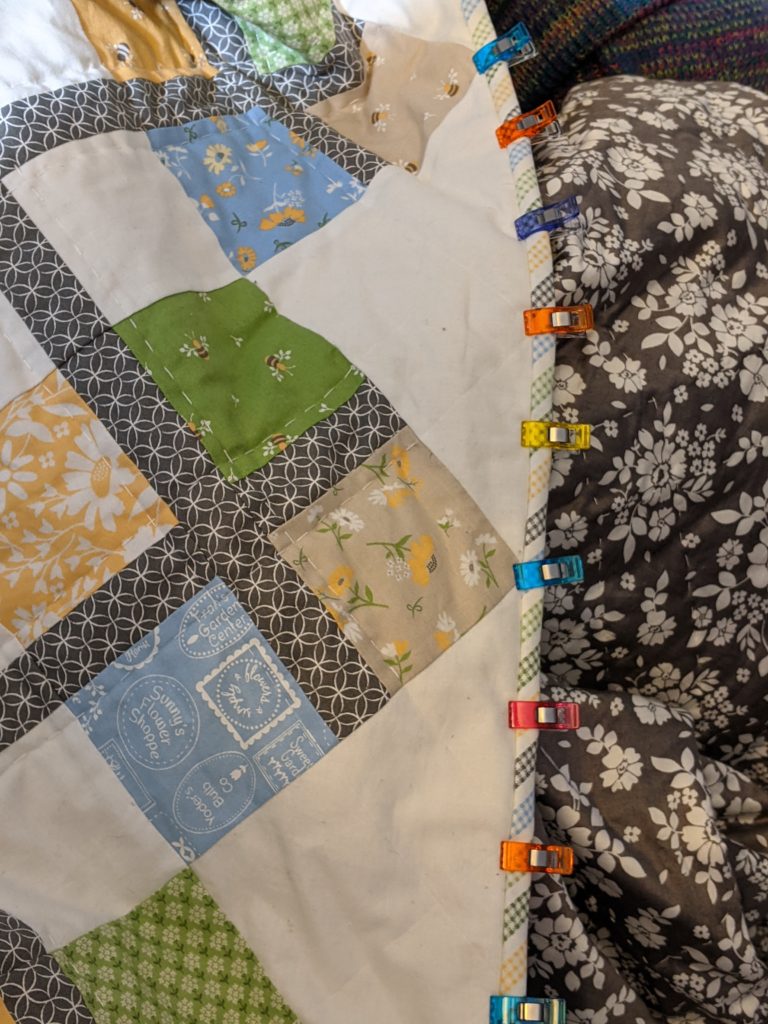
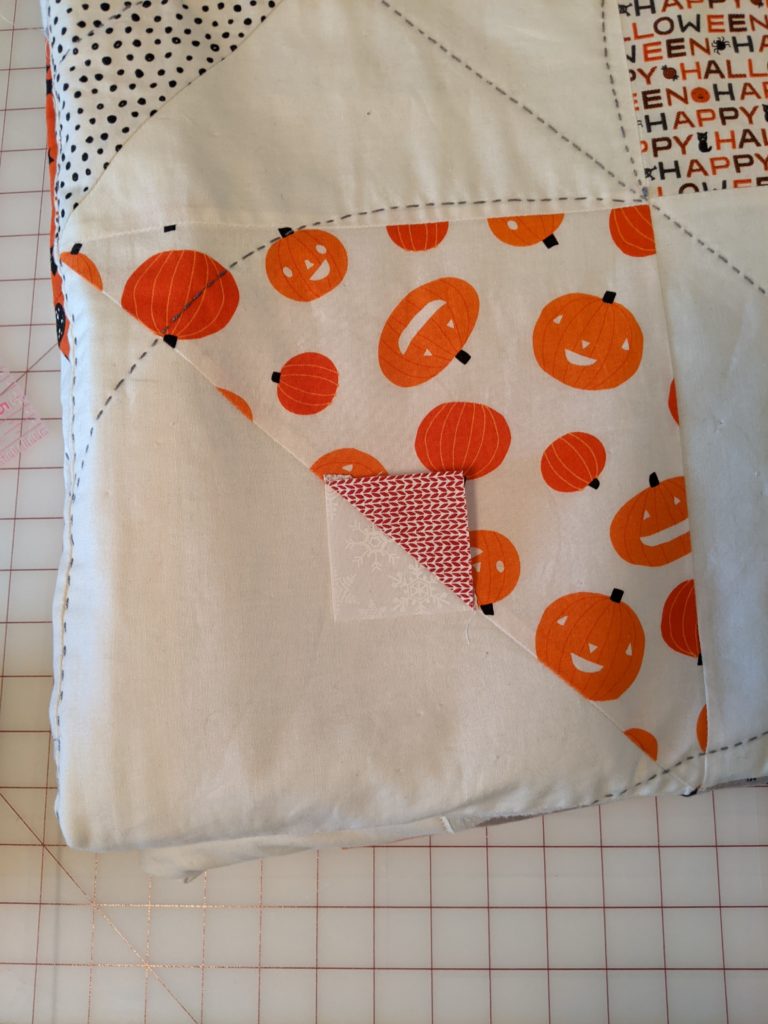
Then it just needed binding. I gave flanged binding a try and I think it’s such a nice effect. I almost always glue baste my quilts for quilting, but this time I also glue basted my binding, to be sure the corners stayed all nicely matched up. It worked really well.

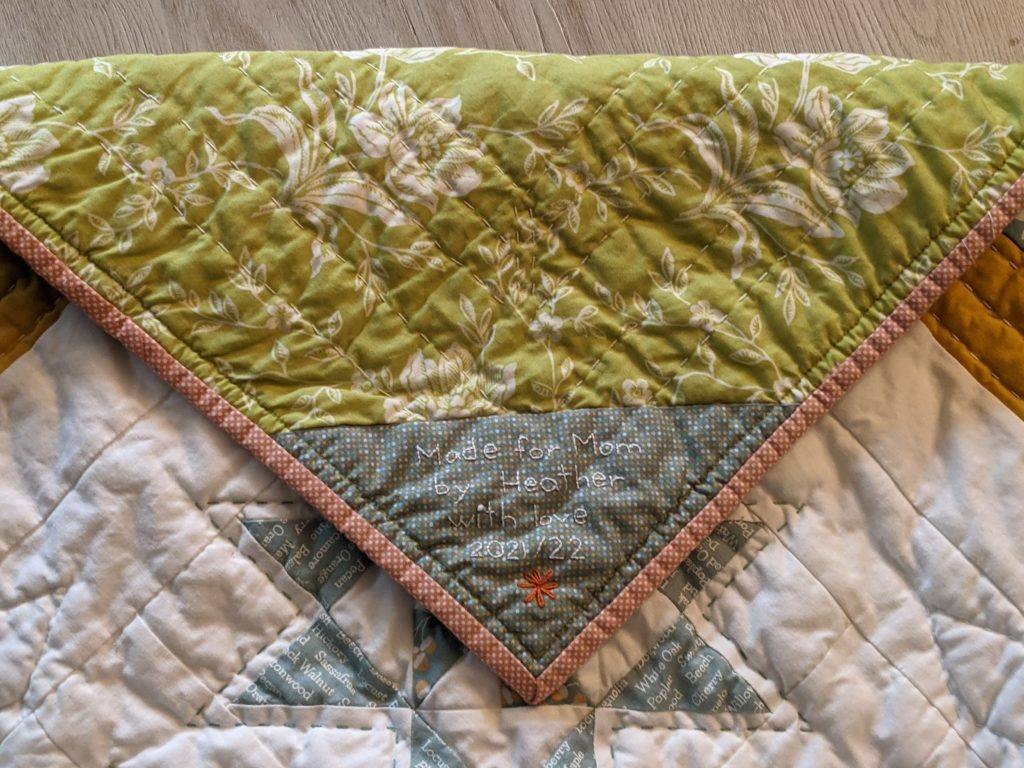
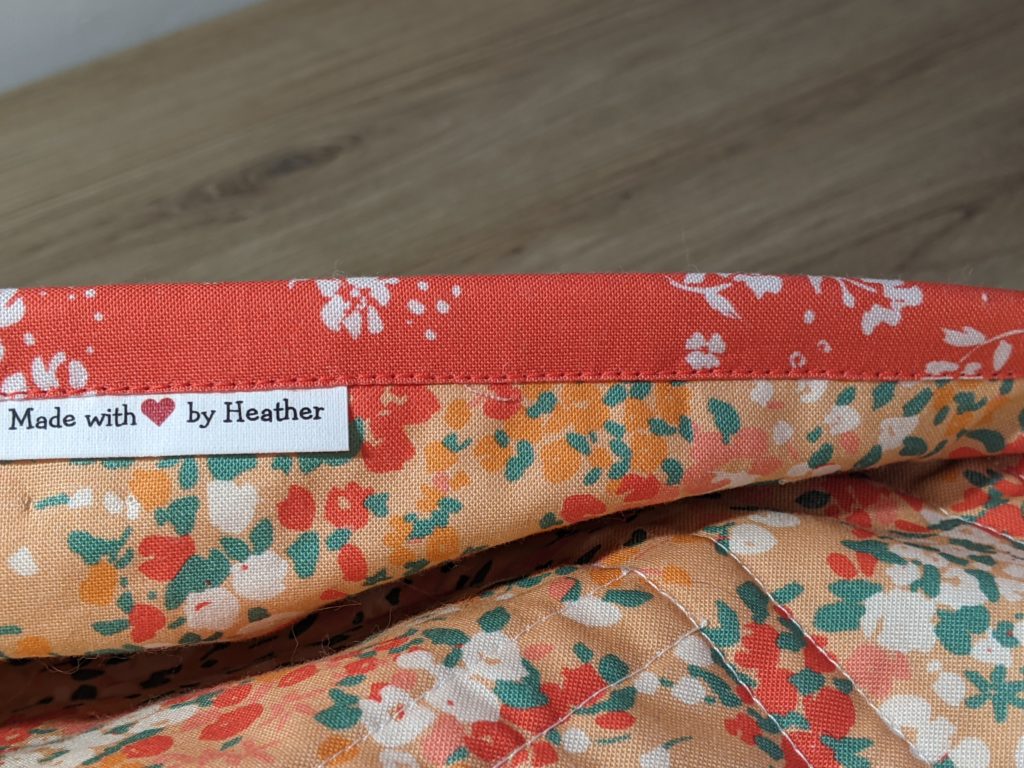
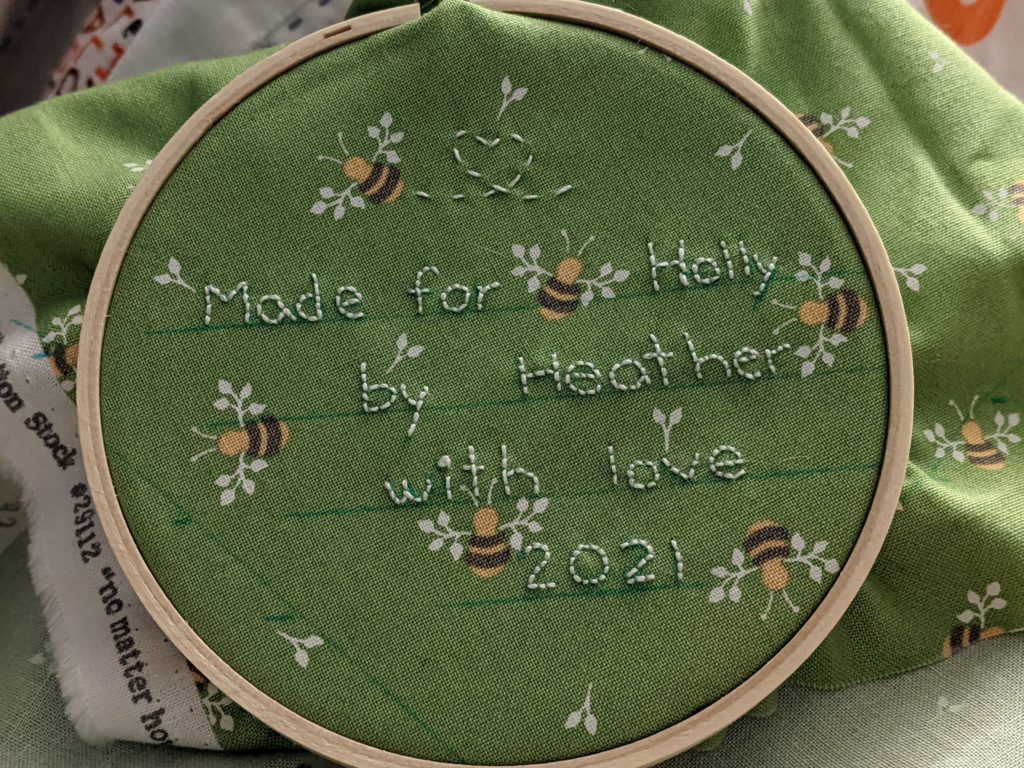
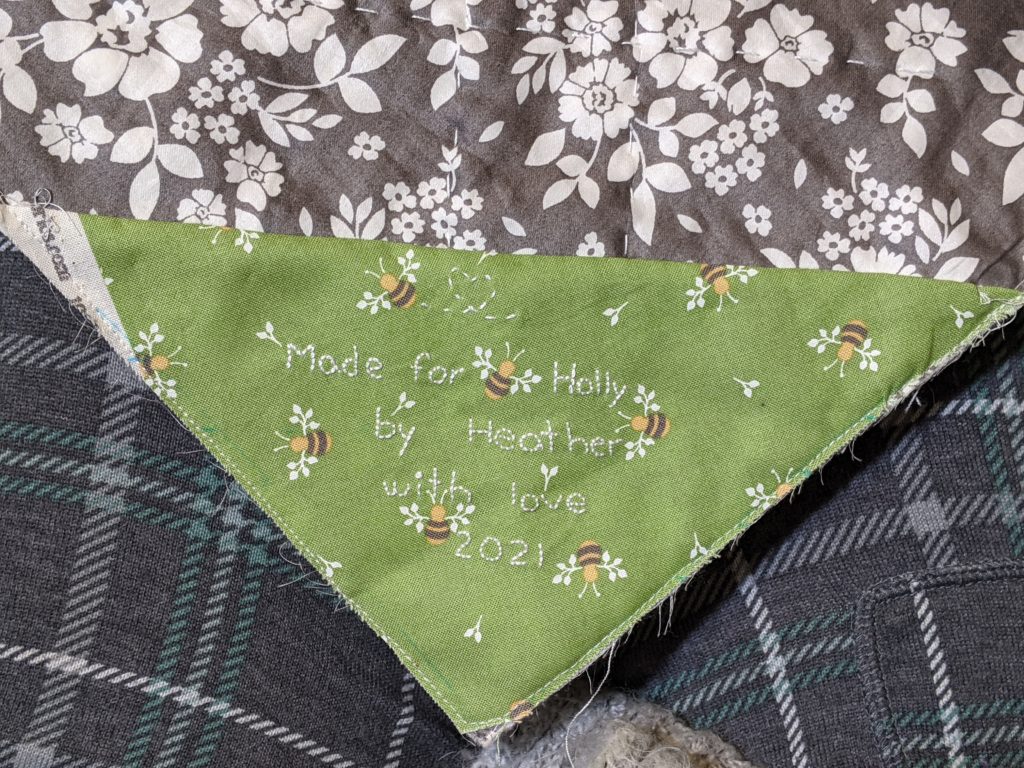
Since triangle tags turned out to be so convenient, I did one here too, with a little embroidered flower as an accent.

Quick Stats:
Prints: Cozy Up by Corey Yoder for Moda
Solids: Bella Solids Pond, Dusty Jade, Melon, Mustard, & Fig Tree
White: Bella Solids Off White
Backing: Woodcut Florals Green 108″ by Fig Tree Quilts for Moda
Quilting: Aurifil 12wt in Natural White, Fern Green, Juniper, & Orange

Love Letter Pillow

      No Comments on Love Letter Pillow

I’ve always been a fan of Valentine’s being for all sorts of love, not just romantic. As a little surprise, I made a little Love Letter Pillow for my sister in the ace pride colors.

The top pieced together quickly and easily, and then I big stitch hand quilted it in a grid pattern to echo the black print. In the middle of this I managed to horribly slice my finger making dinner, and I almost missed my Valentine’s deadline. [6 months later I’ve got a scar and an achiness to the joint that I definitely didn’t used to. Do not recommend.] Fortunately I had done most of the hand quilting already, so after a few days I was able to finish up the last little bit and get the binding on.

All of the fabric used in this project is random stuff from Joanns, mostly fat quarters, except for the binding, which is from Hometown Halloween by Kimberbell Designs for Maywood Studio. Completely the wrong holiday, but it was perfect for my needs. XD

My sister loved it (she’s excellent at receiving handmade gifts, two thumbs up) and apparently it’s made for a very good napping pillow. 💜

Charming Stars

      No Comments on Charming Stars

I started my new job in January and one of my coworkers is having a baby. I haven’t had many reasons to make a baby quilt since I started quilting. I really liked this pattern and I thought downsizing it would make a pretty cute, easy baby quilt.

At this size I needed one 42 square charm pack (Lady Bird from Moda) and a little bit of yardage to make up the missing 6 squares. I went with a solid blue.

Solid white for the stars and sashing, and a little bit of yardage for the outer border and the backing (which is the same print but peach instead of pink). I wasn’t sure how gender role-y my coworker and her husband were (she doesn’t dress super feminine and pink herself, but people can be weird about kids) so I erred on the side of pink-ish.

Usually I do embroidered labels, but usually I know the recipient a bit better. I didn’t know Baby’s intended name, so I got some generic but cute labels off of Etsy.

Generally I hand quilt and hand sew the back of my binding down, but I was feeling a little crunched for time so I machined it. I’m actually really proud of my thread matching for the binding, it worked out really well.

Gave it at the office baby shower and it went over very well. Best of luck to Coworker and Baby!

Quick Stats:
Prints (including backing & binding): Lady Bird by Crystal Manning for Moda
Blue: Bella Solids Coastal

Preppy

      No Comments on Preppy

Finally finished! I started this quilt back in April with the intention of giving it to my sister either for Christmas or her birthday, which is in early December. I had initially intended to make it throw size, but she was upgrading to a full-size bed and indicated she’d like a new blanket…this actually wound up being more queen-size in the end.

So many squares! The original Preppy is 5 x 6 colorful blocks. This one is 9 x 10, so that meant a lot of cutting.

When I was first choosing my fabrics I decided I’d get two of each color for variety, and then when it came time to put them together into blocks I’d probably split them pretty evenly. But once I started looking at the different prints in various pairings I realized that some of the prints just looked better together than others, so the actual distribution is incredibly skewed. There are some combinations that only have maybe 2 blocks, and some that have more like 30. In particular it didn’t look as good to let all of the bee prints wind up together because the print is so much less dense.

By the time I completed all the blocks it was early September. For my birthday in August I’d received this handy dandy design wall. Sadly the whole quilt didn’t even remotely fit on here (9 x 10 colorful blocks total, only 6 x 7 fit up there) but it let me figure out how to distribute the blocks. Most of the color prints read pretty similarly to each other, but the green bee print read really obviously darker than the floral green print, so I alternated the blocks based on the greens, trying not to clump identical blocks too closely together.

Top complete! I laid it out on the guest bed to make sure it was the right size. At this point it was mid-September and I was going for foot surgery in early October. I made sure to get it sandwiched and basted so I could work on the hand quilting while I recovered.

I big stitch hand quilted using white Aurifil 12wt.

Turns out being confined to your couch is excellent for quilting productivity. I finished quilting the entire quilt in two weeks (and also binged Only Murders in the Building, the first season of Halt and Catch Fire, the first season of His Dark Materials, at least 7 Reese Witherspoon movies, and a couple seasons of Kim’s Convenience, plus probably more things that I’m forgetting now).

Then I embroidered the label, which is my favorite way to label my quilts. I used the same thread as I used for the quilting.

This is my first time doing a triangular label but only having to hand sew along one side appealed to me. Usually I do rectangular labels, but usually I don’t write quite as much on them. I ladder stitched along the top edge and machine tacked along the sides in preparation for binding.

I usually like to ‘audition’ my binding’ to make sure it looks like I was hoping, but I was pretty confident about this one so I just jumped right in. Thankfully I was not disappointed, I think the binding is really cute. I machine stitched to the front, flipped to the back, and ladder stitched, which is somewhat slow going but I love how invisible it is.

Binding complete and ready to go in the wash! Gotta get all that glue out before I gift it…

Carefully folded with the label peeking out…

…and taken along to Thanksgiving. Turns out the quilt was family sized! We were helping my sister unfold it so she could see it properly and we all wound up under it together.

I think she likes it. 😊

Quick Stats:
Prints: Spring Brook by Corey Yoder for Moda Fabrics
Background: Moda Bella Off White
Backing: Canning Day Twilight Wide Backing (cotton sateen) by Corey Yoder for Moda Fabrics
Binding: Spring Brook by Corey Yoder for Moda Fabrics
Quilting: Aurifil 12wt in Natural White

Dwell 2

      No Comments on Dwell 2

Finally finished! I started this quilt back in February. I had a layer cake of Pepper & Flax by Corey Yoder by Moda that I bought on a whim a few years ago and had just been sitting in my stash, waiting for the right project. (I have a thing for Corey Yoder’s fabric. I love almost every line she puts out, it’s getting a little out of hand. XD) I also love house quilts, so when I came across Dwell 2 by Thimble Blossoms/Camille Roskelley I decided that was the pattern.

I started by deciding which squares would become my window houses.

Then came a big game of mix n’ match, giving each of the remaining 33 houses a door…

…and eventually chimneys all around.

The six star blocks were made from a fat quarter from one of Corey Yoder’s earlier lines, Flower Mill. The binding is also a green print from Flower Mill. Colors often coordinate well across multiple of her lines, which was really handy here.

I laid out all the houses on my bed to figure out how I wanted to arrange them, then sewed everything into strips, added the sashing between them, and voila! A completed top. I believe I completed the top in late March. Over the next six months I very slowly, a little bit here, a little bit there, handquilted around each house in green perle cotton and around the stars in yellow.

Today I finally finished hand stitching the back of the binding. I basted this quilt with Elmer’s school glue, and unfortunately I got a big glob of it right where I wanted to put my label, so it had to take a trip through the wash before I could truly complete it.

This quilt is for me so I kept the label really simple, just the year. Overall I’m really pleased with my new quilt. I’m cuddled up under it on the couch even as I type this. =)

Quick Stats:
Houses: Pepper & Flax by Corey Yoder for Moda Fabrics
Stars: Flower Mill Sprig Cross Stitch by Corey Yoder for Moda Fabrics
Background: Moda Bella Silky Solids Zen Gray
Backing: Widescreen in Grey by Carolyn Friedlander for Robert Kaufman Fabrics
Binding: Flower Mill Sprig Gingham Stripe by Corey Yoder for Moda Fabrics
Quilting: DMC Perle Cotton Size 8 in Very Light Avocado Green (471) and Medium Yellow (743)

Hippity Hoppity

      No Comments on Hippity Hoppity

I knew I wasn’t gonna see my family for Easter, since they hadn’t been vaccinated yet (I was the first, and I wouldn’t get my second shot till the day after). So I decided to make my mom a quick little project. I saw this pattern on Etsy awhile back and thought it was really cute, so when I was placing ordering fabric for a different project I picked out a few prints for it. I’m pretty pleased overall with the color scheme and I love that floral.

The bunnies came together pretty quickly, and it was satisfying seeing them take shape. The way the pieces fit together was really forgiving, so unless you sewed the wrong corners together or something you didn’t really have to worry about ripping seams to make things match precisely.

I loved each bunny individually as I put it together but the floral was definitely my favorite. 😉

I’d seen a blog post about doing straight line quilting using a multi-stitch zigzag, and I thought that kind of texture might look nice here, while also being pretty quick and easy. I didn’t have the hera marker I’d ordered quite yet, so I marked my lines using the blunt side of a butter knife. It worked well but it made me feel a bit paranoid.

I’d never done a scrappy binding before but I saw some of the pattern reviews had and it looked really cute, so I gave it a go. I made a measuring error in there somewhere but it worked out in the end.

The binding is machine stitched on the front, hand ladder stitched on the back. I know most people do whip stitch, that would definitely be faster, but I just love how totally invisible ladder stitch is. Even though nobody’s going to see the back of a wall hanging. Ah well, we all have our silly little preferences. And then I embroidered a little year tag on a scrap of the floral, which I think came out very cute.

Overall I really liked this project and I could see maybe making it again for myself or as a gift for someone else. I completed this whole project in a weekend, from purchasing the pattern to hand stitching the binding and tag, which makes it absolutely the fastest quilting project I’ve ever made. In general, I’m Really Slow. XD This was a nice (and satisfying) turnaround time.

Quick Stats:
Blue bunny: Anna’s Garden Gingham by Patrick Lose Fabrics
Pink bunny: Bound Treasures Blush from Picturesque by Katarina Roccella by Art Gallery Fabrics
Orange bunny: Kisses Tone On Tone Orange for Riley Blake
Floral bunny: Midsummer Meadow Wild Bouquet Teal by Katherine Lenius for Riley Blake Designs
Background and backing from Joann Fabrics.

Christmas Moda Love

      No Comments on Christmas Moda Love

I finished hand quilting my big Halloween Moda Love in November and decided since I had already missed Halloween that was a good time to set it aside and start the mini charm Moda Love I wanted to make for my mom for Christmas. My track record with gift crafting is fairly abysmal, so the more time I gave myself the better.

Using the handy Moda Love coloring page someone posted on their blog, I figured out which prints I wanted to use and how I wanted to arrange them, then sewed myself a stack of HSTs. I was trying to evoke a wreath, so I knew I wanted the bigger outer star to be green and the inner to be red. I used two Moda mini charm packs to get enough green, ‘Merry Starts Here’ and ‘The Christmas Card’, both by Sweetwater.

I also knew that I wanted to make it a bit bigger (the mini charm version finishes at about a foot square) so I pulled a bunch of the remaining black and white squares and chopped them in half. Not pictured here, I took a single red buffalo plaid mini charm and chopped it into quarters to make cornerstones.

I like the look of borders but I hate attaching them, it always takes me multiple tries to get everything to line up approximately right.

I’m still a coward, so it got some simple echo quilting around in all the white areas. And then it just needed binding! I believe the binding fabric is also Sweetwater, which wasn’t intentional but does mean it matches really well. I was just looking for a candy cane stripe. Like Picking Petals, I machine sewed the binding on the front, flipped it, and hand sewed it on the back. This binding is a bit narrower, 2″, and sewn with a 3/16″ seam allowance on the front.

The back has little corner triangles for hanging and I embroidered a little maker’s tag. Overall I’m really pleased with how this turned out, though I wish I’d felt confident enough to get fancier with the quilting. But it’s done, almost two weeks before Christmas, which is some kind of miracle. I’m so proud of myself. Hope my mom likes it!

Quick Stats:

Prints: ‘Merry Starts Here’ and ‘The Christmas Card’ by Sweetwater for Moda (mini charm packs)
Background: White on white snowflake print from Joann
Backing: Holiday print from Joann
Binding: First Crush Sweet Stripes in Apple Red by Sweetwater for Moda

Halloween Moda Love

      No Comments on Halloween Moda Love

I decided that, over 5 years after I first tried my hand at quilting, it was time to finally make something for me. I love Halloween. I had recently come across the widely-appreciated Moda Love pattern and thought it would be an excellent choice for the Cats, Bats, and Jacks layer cake (stacker? I forget what Riley Blake calls them) I had in my stash.

Some of these fabrics glow! How cool is that? Love it.

Ah, freshly trimmed and pressed HSTs. The squares in this pattern are so enormous. Any bigger and I wouldn’t have been able to use my HST square up ruler.

Ooooh, we’re halfway theeeere! Thankfully no prayers were needed. 😉

Top complete! And laid out on our queen size bed. This would almost be big enough to be a bed quilt, but it would need some borders to get it there. As it is I intend to use it as a really big couch quilt. I like being able to really wrap myself up. (This size Moda Love is 6′ square.)

I wound up deciding to do big stitch hand quilting. I used size 8 Perle Cotton to make a big ol’ spiderweb.

Spiderweb done! When I started this project I had hoped to be done by Halloween, but once I decided on hand quilting that became impossible. I finished the hand quilting in mid-November and decided to set the project aside temporarily to start on my mom’s Christmas present.

Same pattern but with mini charms. Iiiitty bitty in comparison. To be continued!

Quick Stats:
Prints: Cats, Bats, & Jacks by My Mind’s Eye for Riley Blake (layer cake)
Background: Kona in unknown white
Backing: flat sheet from Target
Binding: Halloween 1/8″ stripe by Riley Blake
Hand quilted with DMC size 8 perle cotton in #414.

Picking Petals

      No Comments on Picking Petals

Another wall hanging for my mom! She wanted something to hang over their tv. Pattern is Picking Petals by Carried Away Quilting. This one also didn’t get finished on time, because I suck. Seriously, I don’t even know what my problem is. Sigh.

So the charm pack I used is Mama’s Cottage by April Rosenthal for Moda. I love this line, it’s so colorful and cheery. The backing is more of the green stem fabric. I had a cute light blue-ish polka dot I was going to use, but I decided I’d rather save the dot for somewhere it’ll actually be seen.

Binding is machine stitched on the front and hand finished on the back, for maximum pretty. I somehow managed to completely miscalculate and make about twice as much binding as I actually needed, whoops!

And I actually branched out from stitching in the ditch! A little bit anyway. Baby steps.

My mother did indeed hang it over their tv.

Quick Stats:
Prints: Mama’s Cottage by April Rosenthal for Moda (charm pack)
Stems, background, binding, backing: from Joann

Citrus & Mint – in spaaaace

      No Comments on Citrus & Mint – in spaaaace

A friend I used to work with is my first peer to have a baby! When I first got the shower invite and looked at their registry there was a definite space theme going on. I love space, so I was totally down with that. I chose to make Citrus & Mint, using some very cute space fabric I found on Etsy with a couple prints from Joanns to supplement (the grey dot and the yellow). The backing is a white on white star print. The quilting is just more stitch in the ditch, because I am a coward. I did finally make binding though, and I gotta say I’m into it. It’s so pretty and clean looking and straight. Now I know.

I’m extremely bad at sewing for a deadline, so I didn’t get this done in time for the shower. Honestly, I didn’t even get this done in time for the birth. Whoops. Baby Henry was born in mid October and this wound up being more of a Christmas present. Mom loved it though, so that’s what counts. =)

Quick Stats:
Space Prints: unknown UK fabric bundle purchased from Etsy
Everything else: from Joann